Setting up user accounts in Windows Server 2022 is an essential task for managing access and permissions in your Remote Desktop Protocol (RDP) environment. Whether you’re overseeing a small team or a large organization, proper user account management ensures a secure and efficient working environment.
Creating user accounts allows administrators to control who can access the server and what resources they can use. It’s a critical step for maintaining both security and productivity within your server environment.
This guide will walk you through the process of creating user accounts in Windows Server 2022, from initial setup to configuring remote desktop access. Follow these straightforward steps to get your server up and running with the appropriate user permissions.
Let’s dive into the details and get started on setting up user accounts for your RDP setup.
Why Create User Accounts in Windows Server 2022?
Creating user accounts in Windows Server 2022 is essential for effective server management. It allows you to:
- Control Access: Determine who can log in and what resources they can access.
- Enhance Security: Assign permissions and monitor user activities to safeguard your server.
- Organize Management: Streamline user roles and responsibilities, ensuring smooth and efficient operations.
Step-by-Step Guide to Creating User Accounts
Step 1: Open Computer Management
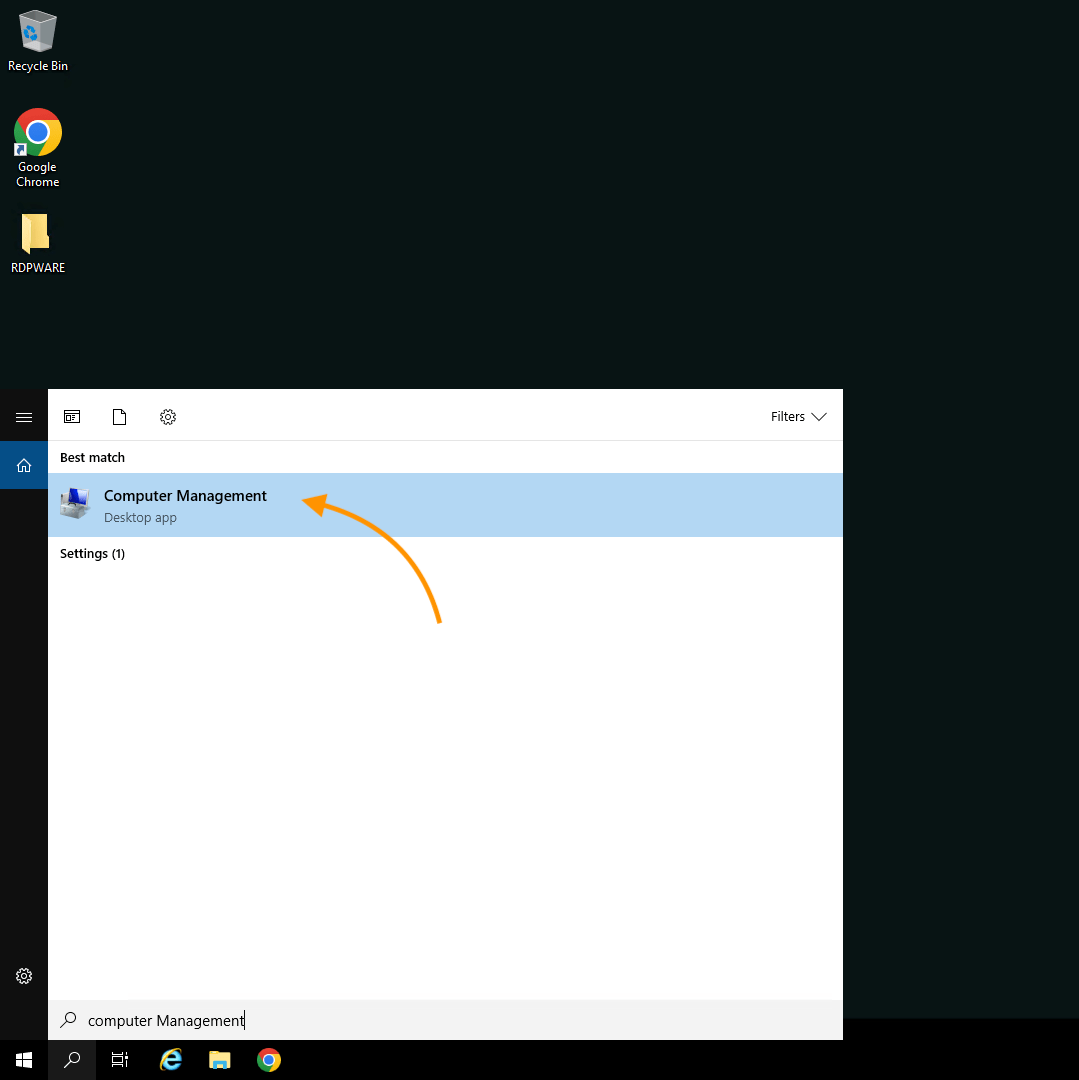
- Search for Computer Management: Click on the Start menu and type “Computer Management” in the search bar.
- Open the Application: Select Computer Management from the search results to launch the console.
Step 2: Access User Management
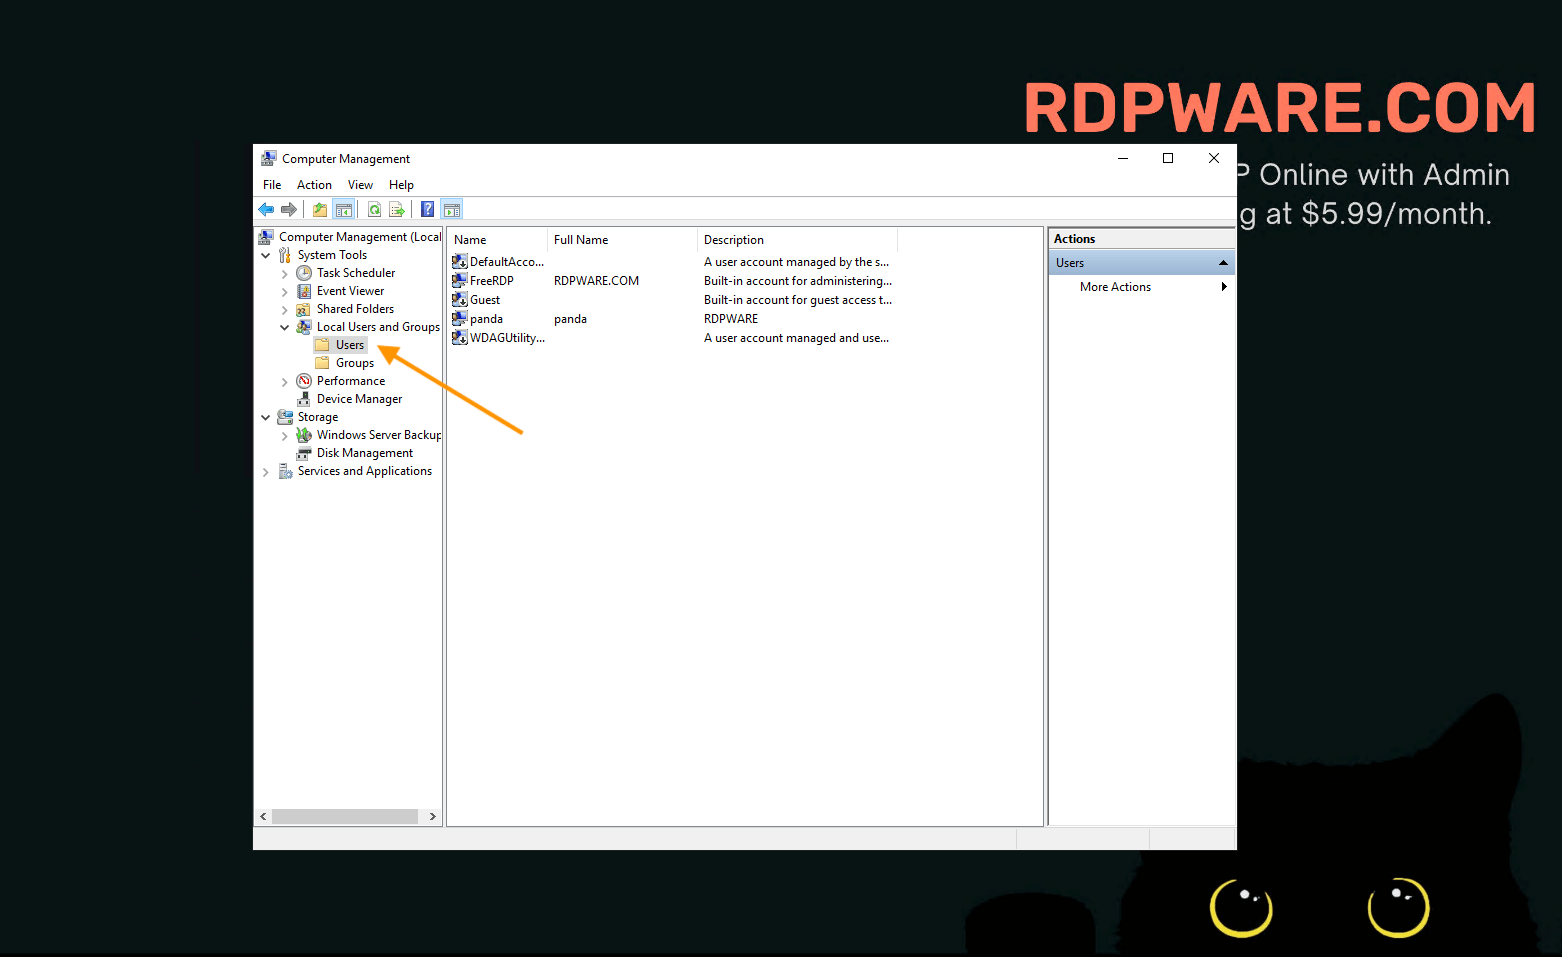
- Expand Local Users and Groups: In the Computer Management window, expand the Local Users and Groups section on the left-hand menu.
- Select Users: Click on Users to view the list of existing accounts.
Step 3: Create a New User
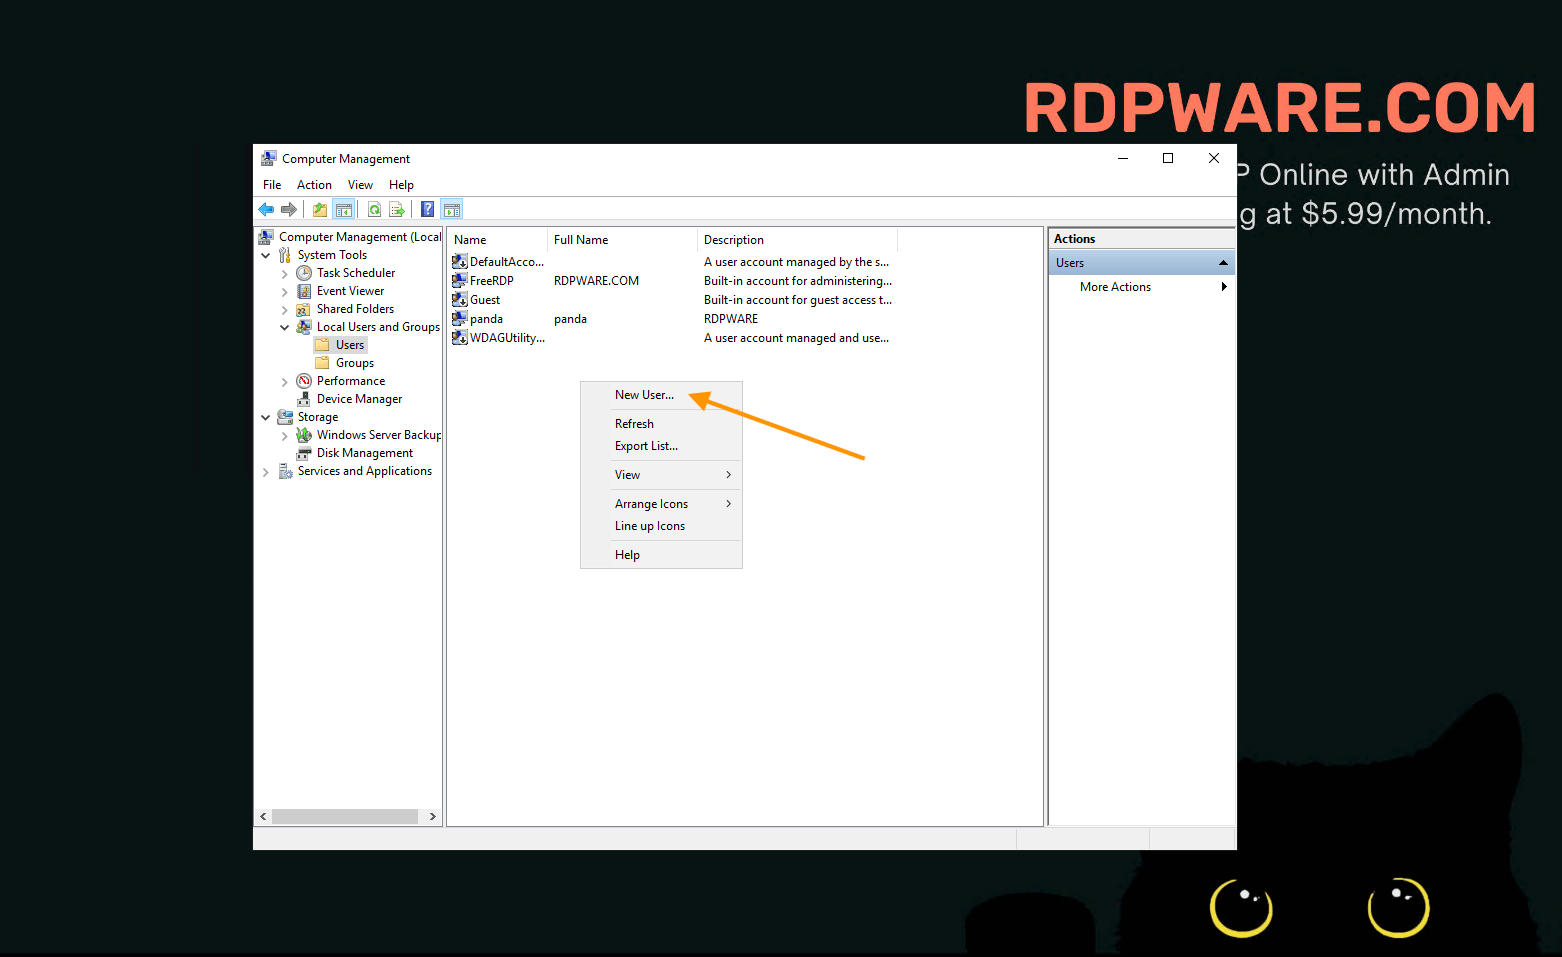
- Initiate New User Creation: Right-click within the right pane and select New User from the context menu.
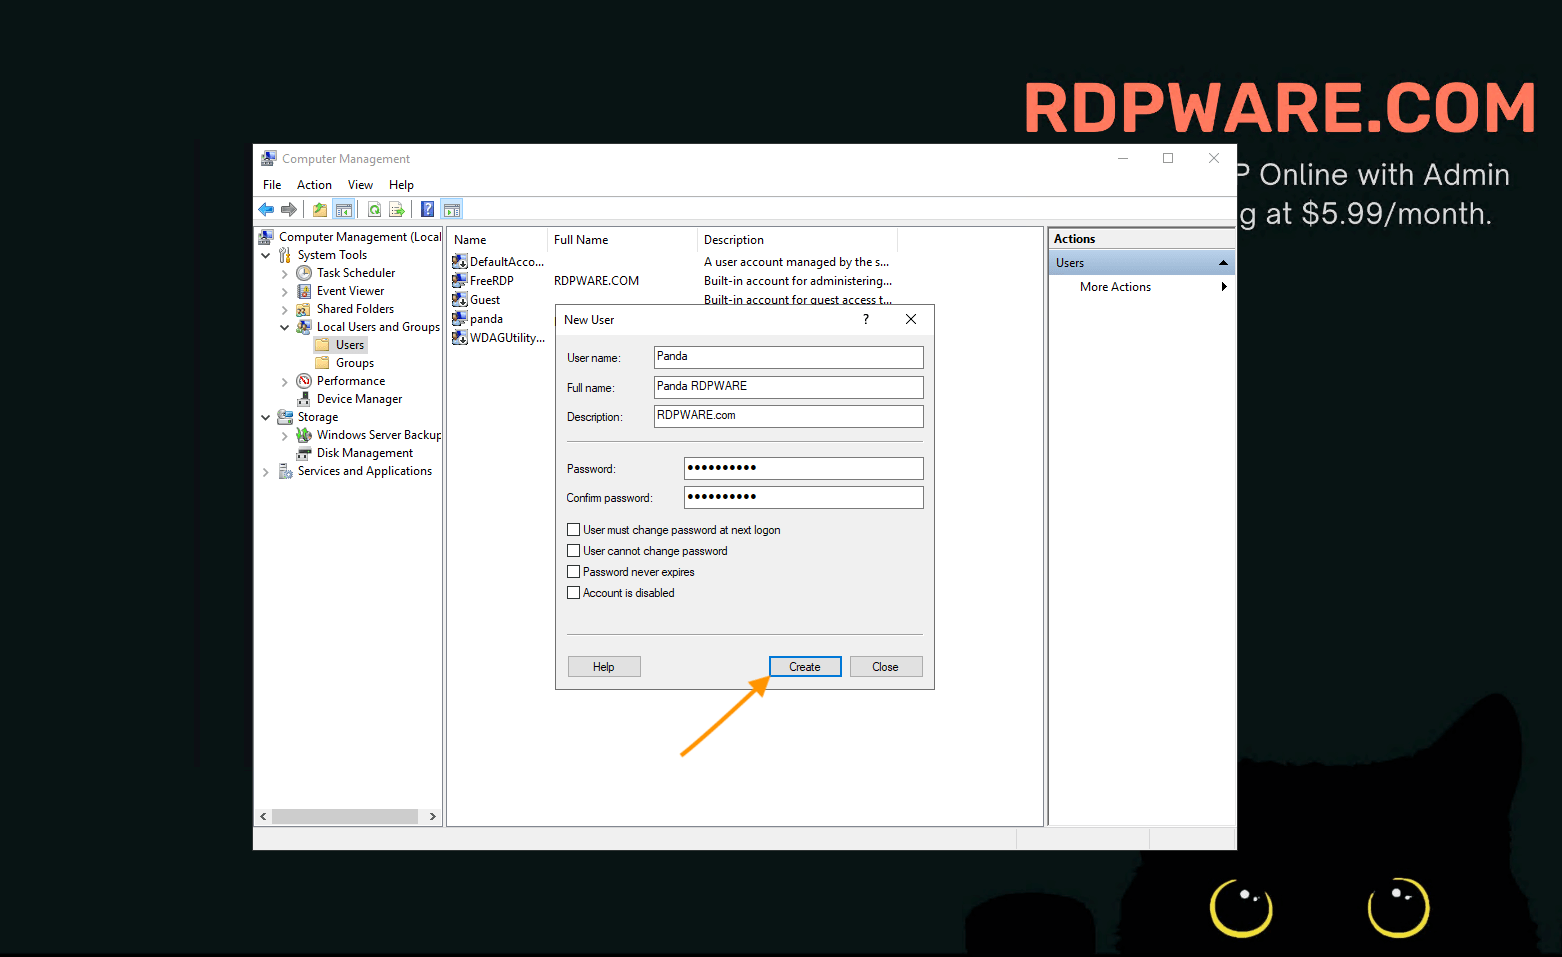
- Enter User Information: In the New User dialog box, input the following details:
User name: Enter the desired username.
Full name: Provide the full name of the user.
Password: Set a secure password for the account.
- Configure Password Options: Choose from options such as:
User must change password at next logon
User cannot change password
Password never expires
User cannot change password
- Create the User: Click Create to finalize and add the new user account.
Step 4: Assign Remote Desktop Users Permission
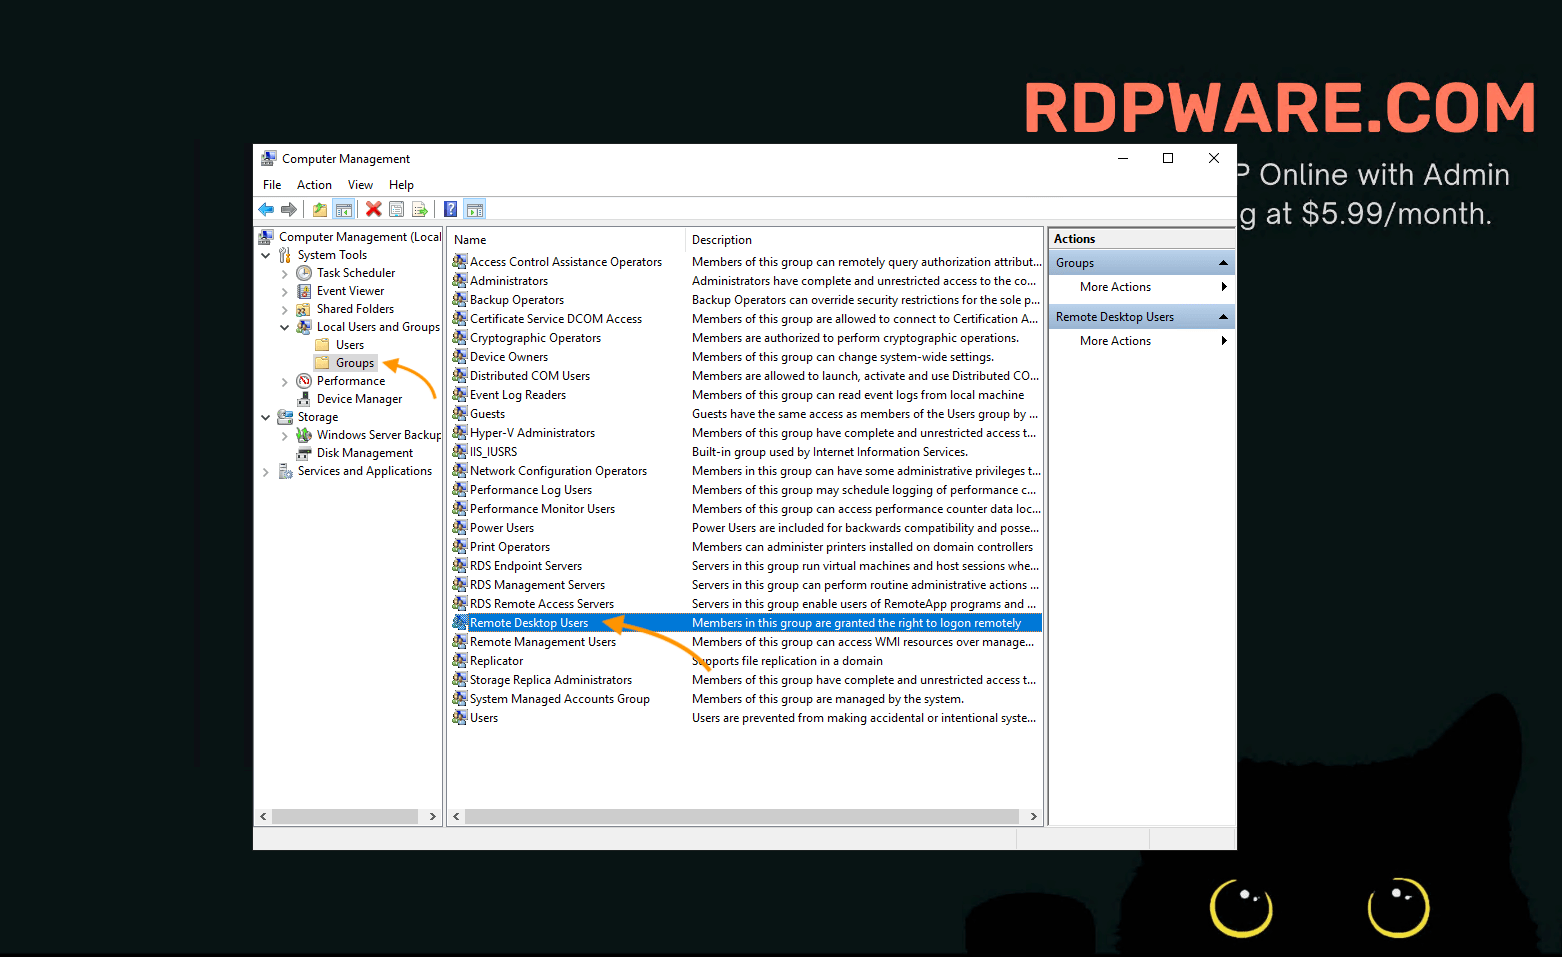
- Navigate to Groups: In the Computer Management console, expand Local Users and Groups and click on Groups.
- Select Remote Desktop Users: In the Groups list, find and double-click on Remote Desktop Users.
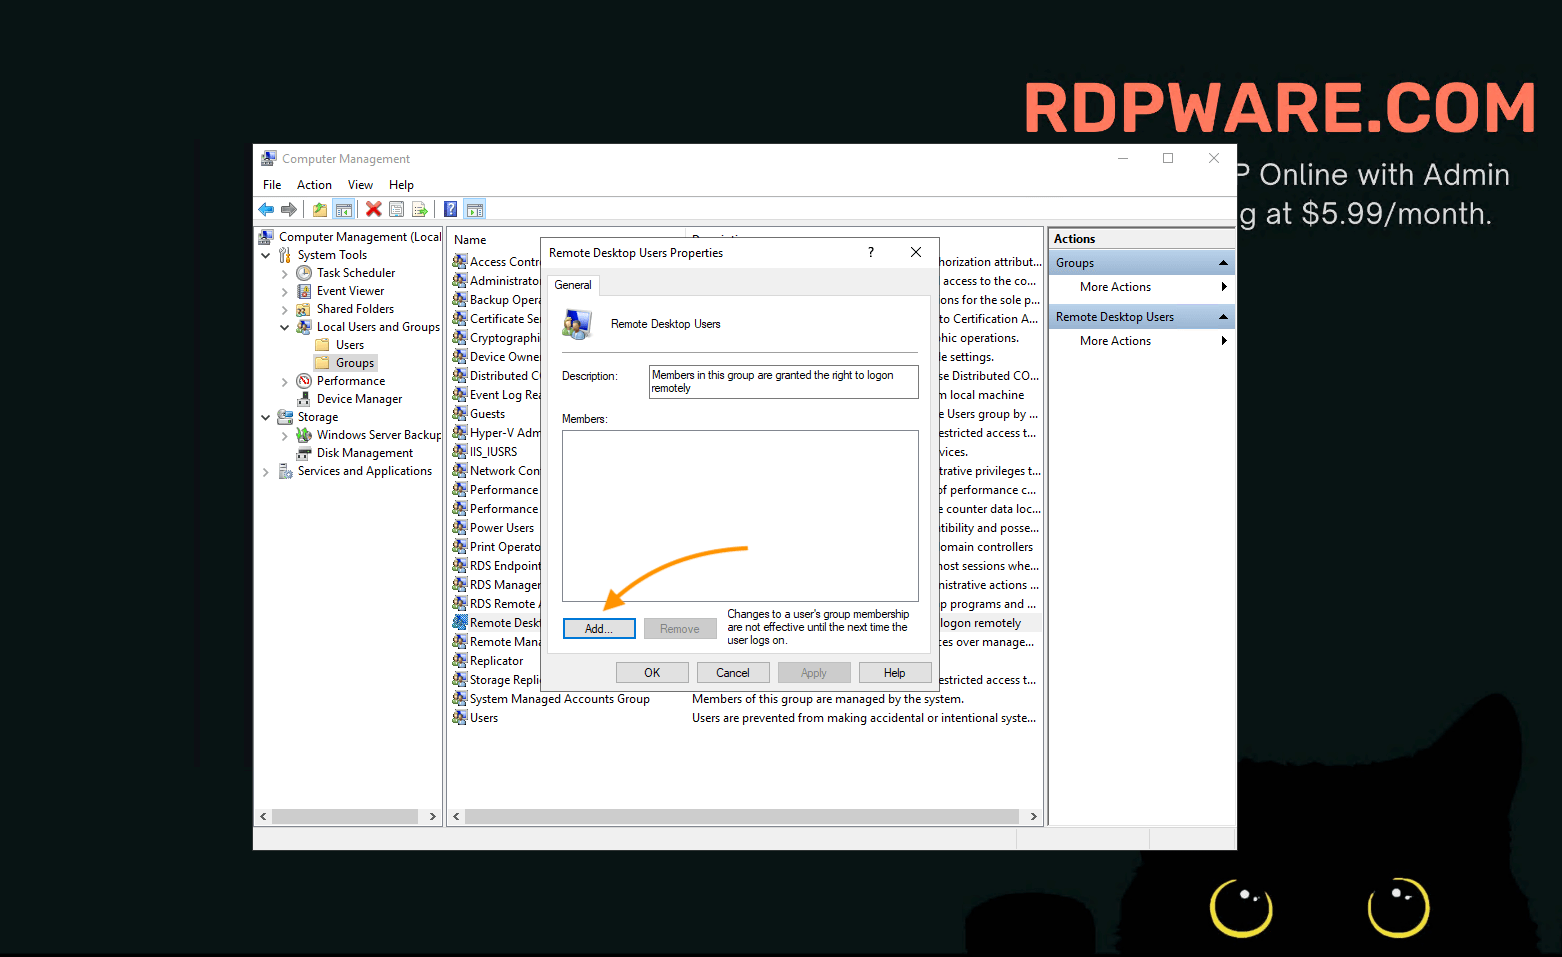
- Add User to Group: In the Remote Desktop Users Properties window, click on Add.
- Enter User Details: Type the username of the account you want to add, or click Advanced and Find Now to select the user from the list.
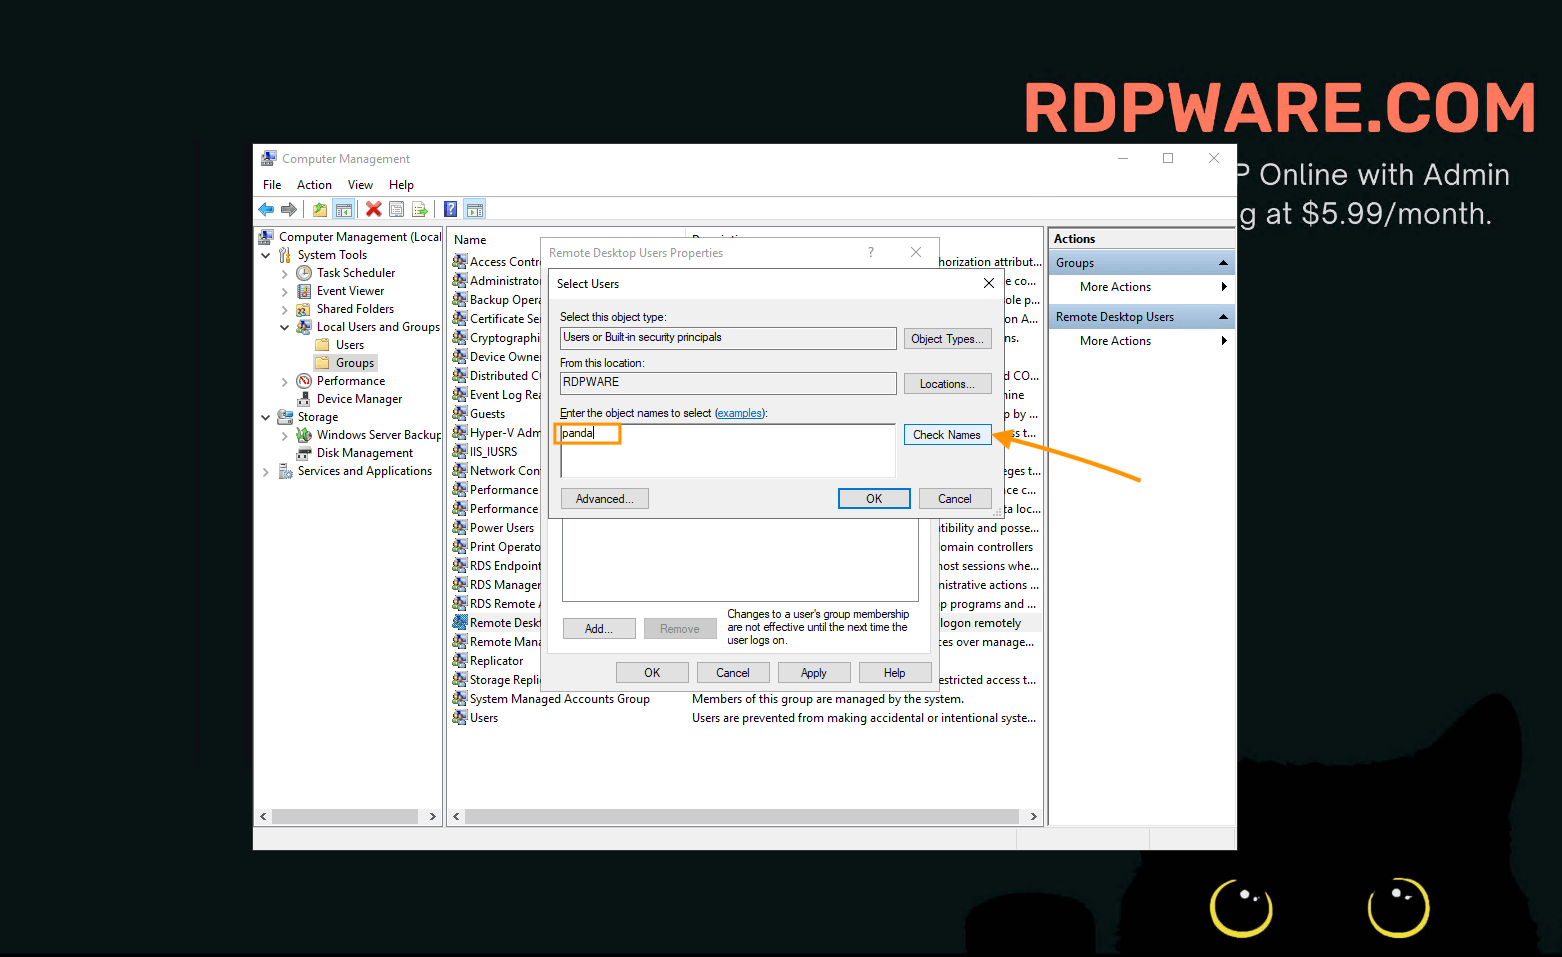
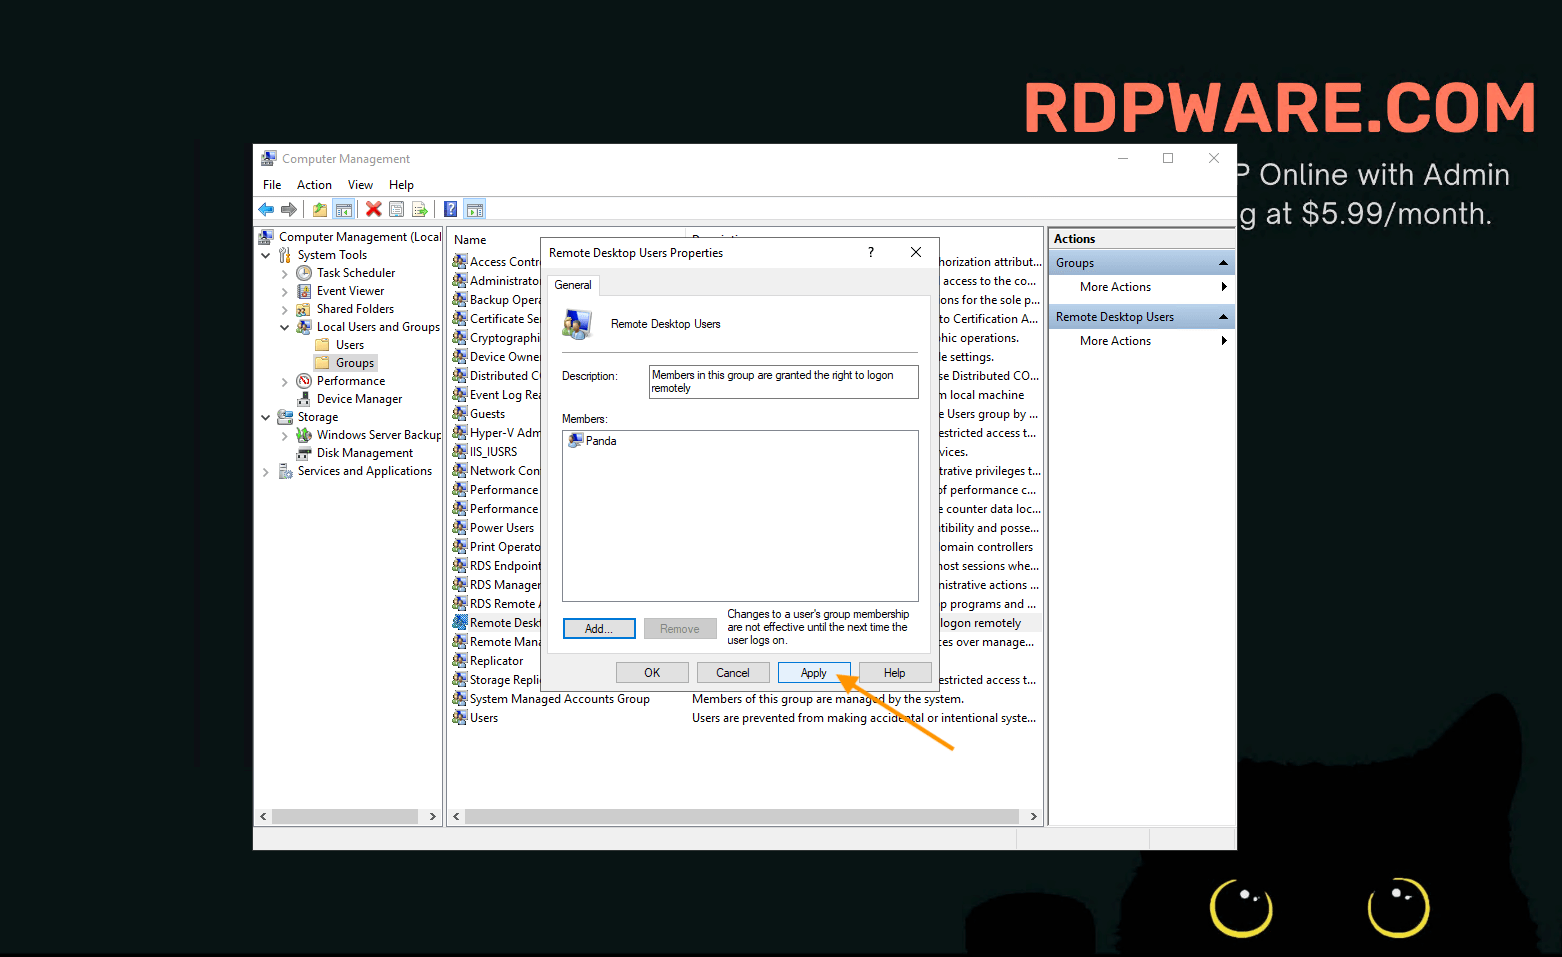
- Confirm Addition: Click OK to add the user to the Remote Desktop Users group, and then click Apply and OK to save the changes.
Step 5: Verify User Access
- Test Remote Desktop Connection: Use a remote desktop client to connect to the server using the new user’s credentials.
- Confirm Permissions: Ensure the user has appropriate access and functionality as configured.
Troubleshooting Tips
If you encounter issues while creating or managing user accounts in Windows Server 2022, here are some common problems and solutions:
- User Cannot Log In: Verify that the user is part of the Remote Desktop Users group. Ensure that their account is not disabled and that Remote Desktop is enabled on the server.
- Permission Denied: If users receive permission errors, check their group memberships in Computer Management. They should be assigned to groups like Remote Desktop Users or Administrators as needed.
- Forgotten Password: If a user has forgotten their password, you’ll need to reset it. For guidance on changing or resetting passwords, refer to our article on How to Change Your RDP Password.
- Username Issues: To correct or update usernames, use the steps outlined in our guide on How to Change the Username in Windows RDP.
- Remote Desktop Connection Errors: Ensure the server’s firewall allows RDP traffic and that the RDP service is running. Verify that the correct IP address and port (default is 3389) are being used.
- Account Locked Out: If an account gets locked due to too many failed login attempts, unlock it via the Computer Management console.
Conclusion
Creating user accounts in Windows Server 2022 is a straightforward process that enhances security, access control, and management efficiency. By following these steps, you can ensure that your server is well-organized and that users have the appropriate permissions for their roles. Properly setting up user accounts is essential for maintaining a secure and functional RDP environment.


